Thursday, November 29, 2012

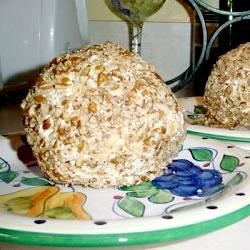
Pepper and Pineapple Cheese Ball

My Sister-in-law made this cheeseball last year and I couldn't stop eating it! There was something so delicious about it, and I didn't know what. When she told me the recipe has pineapple in it I couldn't believe it! Pineapple and Green Peppers??? But it works, I'm telling you! Try it!

Pineapple Cheese Ball Recipe
Pepper and Pineapple Cheese Ball  (from Jennie Evans)

2 packages cream cheese-softened
1/4 cup green peppers chopped very small (Also green chilis or jalapenos would be awesome!)
1/4 cup green onion also chopped small
1 tsp. season-all
1 small can crushed pineapple (this is the almost tuna sized can)
Crushed nuts (walnuts, pecans,  or almonds)

Mix together, then shape into a ball. Cover with saran wrap.

Wednesday, November 28, 2012

Sweet Potato Casserole

I got this recipe from a boyfriend's mother a long time ago, and it has been a hit during holidays ever since. I added a few more spices, but it's always amazing- especially with those who claim to hate yams!


(picture from Elizadomestica.com)

Sweet Potato Casserole addapted by Erin Taylor


Mix together:
3-4 large sweet potatoes- skin them, then boil until soft & mash (I cooked mine in the crock pot with water overnight, and omitted the milk*.)
1 cup sugar
2 eggs, well beaten
1/4 cup melted butter
1 tsp vanilla
2 Tsp. Cinnamon
1 tsp. allspice
2 tsp. salt
1/3 cups milk*
Pour ingredients into a sprayed 9 X 13 pan.
Cover with coconut topping:

Topping:
1 cup brown sugar
1/2 cup flour
5 Tbl melted butter
1 C. shredded coconut
1 cup pecans chopped (optional)

Bake at 350 deg. for 30-40 minutes or until golden brown and bubbly.

Friday, November 9, 2012

Shrimp and Pumpkin Creole Soup


I love pumkin soup- you know, the kind with warm spices of cinnamon and nutmeg? Well, my husband does NOT like that kind. So today I made pumkin soup but added creole spice and shrimp. Hello, new favorite! And perfect for a chilly winter day!

Shrimp and Pumpkin Creole Soup by Erin Taylor

2 C. pumkin puree (I used fresh, but canned would work great.)
1 Quart chicken stock (or 1 Qt. water and 1 Tbsp. chicken bouillon)
2 C. water (for thicker soup, add less water, for thinner, add more.)
1/4 C. chopped red bell pepper
1/4 C. chopped celery
1 Tbsp chopped onion
1 C. chopped uncooked shrimp, peeled and deveined, tails off
1 Tbsp Creole Spice
1/2 C. powdered milk
1 tsp. cayenne pepper
*(optional) 1 Tbsp bacon bits  (adds a bit of smokey flavor)
Salt to taste

In medium pot combine all ingredients. (If soup is too thick, thin with water to desired consistancy.)  Heat on medium stirring often for about 10 minutes. Using stick blender, or regular blender, puree all contents of pot until nice and smooth in texture. Return to heat and simmer on low for 15 minutes to let all flavors combine.

Great with cornbread!

Wednesday, November 7, 2012

Black Tie Mousse Cake

*the Real* Black Tie Mousse Cake by Olive Garden. Photo by baylor_gal
(photo by baylor_gal on food.com)

I'm not kidding you, this stuff is like heaven in your mouth. Your tastebuds will scream for more. Your body will crave it when it's gone. You will dream about it!  It has many steps, and you need to be patient, but when you take it out of the refridgerator and slice through the smooth creaminess, and your tongue slides the rich, fluffy mousse from your fork, and your saliva starts to ooze like a slow moving chocolate river, you will KNOW you did the right thing!


Black Tie Mousse Cake  (from Food.com)

Ingredients:

Layer 1:

1 box Devil's Food cake mix (prepared in two round cake pans according to box directions. You will use one round for this recipe.
1 pkg. chocolate pudding mix- added to cake mix

Layer 2:

  • 1 teaspoon knox unflavored gelatin

  • 1 tablespoon cold water

  • 2 tablespoons boiling water

  • 4 ounces semi-sweet chocolate chips

  • 4 ounces cream cheese, cubed

  • 3/4 cup heavy cream

  • 1/2 teaspoon granulated sugar

  •  
    Layer 3:

  • 3 egg yolks

  • 1/4 cup granulated sugar

  • 3 tablespoons flour

  • 1 teaspoon knox unflavored gelatin

  • 1 3/4 cups heavy cream

  • 1 teaspoon vanilla extract

  •  
    Layer 4:
     

  • 1 1/2 cups heavy cream
  • 2 tablespoons butter
  • 18 ounces semi-sweet chocolate chips
  • 1/2 cup white chocolate chips (optional)
  •  
  • mini chocolate chips for decorating sides of cake
  •  

    Directions:

       
    1. BOTTOM LAYER (cake)
    2. Bake according to directions on box using 2 round pans, then cool. Once cooled, use the cake from one pan as one layer (you do not need the second cake from the second pan. In other words, you only need half the box cake recipe). Place this round cake at the bottom of a CHEESECAKE PAN. Press it with your fingers and flatten the cake a little. This is the bottom layer out of four layers.
    3. SECOND LAYER (the chocolate mousse):
    4. Melt chocolate and cream cheese together. Let cool. Soften gelatin with cold water for 1 minute, then add boiling water, stir until dissolved and clear. Let this cool while you start whipping the heavy cream and sugar. As cream starts to thicken, add gelatin. Continue to whip until stiff peaks form. Add 1/4 of the cream to the chocolate mixture and mix thoroughly. Then fold this into the remaining cream. Once you have it completed, spread this chocolate mousse onto the cake and refrigerate.
    5. THIRD LAYER (the custard):
    6. Beat egg yolks until pale. Add sugar, flour, and gelatin, then beat until mixed. Bring cream and vanilla extract to a boil. Add a small amount of cream to egg mixture while stirring. Gradually add until all of the cream has been added and then pour entire mixture through a strainer into the pan. Continue to cook until custard begins to thicken. Cool slightly, then pour on top of the chocolate mousse layer and freeze while getting the fourth layer ready.
    7. FOURTH LAYER (the icing):.
    8. Please note: this makes a lot of icing so feel free to half this part of the recipe (I just happen to like a lot of icing on top). Bring butter and cream to a boil, pour over chocolate and let sit for 5 minutes. Stir until smooth. Let cool until it starts to thicken. Remove cake from freezer, remove the cheesecake pan collar, then pour some of the icing and use a spatula to spread it evenly across the top and sides of the cake. While this is still wet, put mini chocolate chips onto the side of the cake. Optional: Melt half a cup of white chocolate chips (in the microwave) and swirl into the icing if you want yours to look like the picture.
    9. Refrigerate the cake. Serve cold. Delicious!

    Tuesday, October 30, 2012

    Kung Pao Chicken

    This asian dish cooks up quickly, despite the long list of ingredients, and tastes delicious! (This image is taken from Uchinatravel.com. I was going to take a picture of mine, but we ate it all, and an empty plate wouldn't be as attractive.)


    Kung Pao Chicken (and/or Lettuce Wraps*)  by Erin Taylor
    serves 4

    Chicken and veggies:
    3 Tbsp canola or peanut oil
    1 C. chicken breast, cubed (would also work great with shrimp!)
    1 C. chopped celery
    1/2 C. chopped red bell pepper
    2 green onions, chopped
    1/2 C. carrotts, chopped
    1/2 C. snow peas or sugar snap peas
    1 tsp. chopped garlic

    sauce ingredients:
    2 Tbsp hoisin sauce
    1 Tbsp.  fish sauce
    1/4 C. low sodium soy sauce
    2 Tbsp. peanut butter
    2 Tbsp. poultry gravy mix
    1 C. water
    1 tsp. red pepper flakes (omit for no heat, add more for more heat)
    salt to taste

    1 bag cole slaw mix
    cooked rice
    salted peanuts (for garnish)
    Lettuce leaves (for lettuce wraps, only)

    In large skillet or wok, heat oil. Add chopped chicken and cook quickly until chicken begins to turn white. Quickly add remaining vegetables and saute until they become slightly tender. (about 3 minutes.) Turn heat down and add remaining sauce ingredients. Stir and let simmer with lid off until chicken is finished cooking.  (add more water for a saucier dish.)

    Place small handful of cole slaw mix onto center of plate. Scoop cooked rice over cole slaw mix. Smother with Kung Pao chicken and sauce and garnish with salted peanuts. Serve immediately.

    *For Lettuce wraps, complete instructions for chicken and veggies, and sauce. Add 1/4 C. salted peanuts to mixture. Spoon into large lettuce leaves and roll up.


    Friday, October 12, 2012

    Green Tomato Enchilada Sauce


    (picture taken from ifood.tv)

    Every time we go to a mexican restaurant my husband asks "Do you have green sauce?" He is usually disappointed with the so-called green sauce. Well, I had an over-abundance of green tomatoes and thought I'd make my own. The verdict? Well, let's just say if he had to choose to either marry me all over again or eat that sauce the decision might be a difficult one!  Needless to say, it's a great way to use up those unripened tomatoes after your harvest!

    *NOTE: this canning recipe is for about 6 quarts of sauce, and is not exact! Adjust seasonings to your own taste!

    Green Tomato Enchilada Sauce by Erin Taylor

    In a large pot with heavy bottom (I used an 8 quart pot), add:

    (about) 5 quarts pureed green tomatoes. (measured after they are pureed)

    Turn on med. heat and let cook while pureeing the following ingredients in a blender:

    6-7 Anaheim Chilies, seeds removed (no need to roast or peel)
    1 onion
    1 bunch cilantro
    4-5 jalapenos, seeds removed for mild sauce, or add seeds for more heat.

    Stir into pot with tomatoes and let cook a few minutes.

    Add 4-5 C. chicken stock and 1/2 c. Poultry Gravy powder. Stir thoroughly.

    Next, add:

    3-4 Tbsp. Cumin Powder
    2 Tbsp Chili Powder
    1-2 Tbsp. Garlic Powder or Salt
    1/4 C. Olive Oil
    Salt to taste

    Let simmer for about 10 minutes stirring every few minutes. With a stick blender puree mixture for about 3 minutes to make it smoother.

    Remove from heat and pour into sterilized quart jars. Process according to directions on canner.

    Monday, September 24, 2012

    Harry Potter Butterbeer

    Harry Potter Butterbeer? Well, this tastes exactly like I always imagined it would! And it's perfect for those crisp fall evenings watching the movies.


    Butterbeer


    Serves: 4


    1 C. brown sugar

    2 Tbsp. water

    6 tbsp. butter

    1/2 tsp. salt

    1/2 tsp. cider vinegar

    3/4 C. heavy cream

    1/2 tsp rum extract


    4 12oz. bottles club soda *  (*using unsweetened soda makes it tollerably sweet, rather than over-the-top unbearably sweet like other recipes calling for cream soda or Sprite.)


    In small saucepan over medium heat, combine the brown sugar and water. Bring to a gentle boil and cook, stirring often, until the mixture reads 240 deg. on candy thermometer. Stir in the butter, salt, vinegar and 1/4 C. heavy cream. Set aside to cool to room temperature. Once the mixture has cooled, stir in the rum extract.


    In a medium bowl, combine 2 Tbsp of brown sugar mixture and remaining 1/2 C. heavy cream. Use an electric mixer to beat until just thickened, but not completely whipped.


    To serve, divide the brown sugar mixture between 4 tall glasses. (about 1/4 c. for each glass). Add 1/4 C. of club soda to each glass, then stir to combine. Fill each glass nearly to the top with additional soda, then spoon the whipped topping over each.

    Divine Hot Fudge Sauce

    I LOVE homemade hot fudge! Who doesn't?  Well, I tried a new recipe last night- other than my usual- and it was divine! It takes just a few minutes to make.
    Hot Fudge Sundae
    Divine Hot Fudge Sauce
    (taken from my friend Karen Brown's recipe. I doubled the recipe so I can keep the rest in a jar in the fridge for later and made one small change noted with an *)

    2 C. sugar
    1 Can evaporated milk
    1/4 C plus 1 Tbsp. Cocoa powder
    2 Tbsp. Karo Syrup

    2 Tbsp. butter
    1 tsp. Rum flavoring* (original recipe calls for 2 tsp. vanilla)

    In saucepan, boil first 4 ingredients, stirring constantly until a ball forms when dropped into cold water. (This was about 5 minutes.)  Remove from heat and stir in butter and rum flavoring.  Serve over ice cream. Keep left overs in covered container in refridgerator and eat by the spoonful when the kids are at school!

    Tuesday, September 4, 2012

    Fluffy and Light Dinner Rolls


        (picture taken from http://www.life-as-a-lofthouse.blogspot.com/2011/08/texas-roadhouse-rolls-and-cinnamon.html#)

    I saw these on Life as a Lofthouse blog and wondered if they really would taste like the Texas Roadhouse rolls they claimed to be. Verdict: I can't say they were like Texas Roadhouse, but they were really quite delicious and light and fluffy. I loved them so much I have taped the recipe to the inside of my cabinet where I keep all my go-to recipes, so that should say something! I tweaked the recipe a bit to eliminate the scalded milk step, and halved it. (maybe this is why they didn't taste exactly like the "real" thing. Hmmm... maybe I should try them the original way first, huh? Well, these were great as they are!)

     
    Fluffy and Light Dinner Rolls
    Yields 12 large rolls

     
    2 teaspoons Active Dry Yeast

    1/4 cup Warm Water

    1 cup Warm Water ( or Whole Milk, scalded and cooled to lukewarm)

    1/4 C. dry milk (omit if using whole milk)

    1 1/2 Tablespoons Butter, softened

    1/4 cup Sugar

    3.5 cups All-Purpose Flour

    1 Eggs

    1 teaspoons Salt

     
    DIRECTIONS: Dissolve yeast in warm water with  sugar, in the bowl of a stand mixer. Once yeast has dissolved, add milk, sugar and 1 cup of flour. Beat thoroughly on medium speed. Let stand until foamy (about 2 minutes). Add butter, eggs and salt. Beat well.

    Gradually add in another 2.5 cups of flour, slowly, to form a soft dough while mixer is on low.  *NOTE* Do not use more than 4 cups of flour total. The dough will be very soft and somewhat sticky, you may think it needs more flour, but it does not.

    Knead dough in stand mixer with the dough hooks, for about 4 minutes. If you knead it with your hands, you will need to grease up your hands with some cooking spray, to help the dough from not sticking to your hands.

    Once kneaded, place into a large, greased bowl. Place dough inside, and turn over to grease top. *NOTE* Again, dough will be sticky so you may need to grease your hands to handle while putting dough in the bowl to let rise. Cover, and let rise in a warm place until doubled in size.

    Once dough has risen, remove from bowl and place onto a lightly floured surface. Lightly flour a rolling pin, and roll dough out into a large rectangle, that is a 1/2 inch thick. Cut dough in half length-wise and then in strips making 12 total, then fold each strip into thirds, or roll it up and place in greased baking dish. (or if you want squares like Texas Roadhouse,  using a pizza cutter, slice dough into 12 large squares. Place squares onto greased cookie sheets. Cover, and let rise again, until doubled in size.

    Bake rolls at 350 for 16-18 minutes, or until lightly golden on top. Remove from oven, and immediately brush tops with butter.


    Friday, July 20, 2012

    Stuffed Zucchini

    This meal could not be simpler, or more delicious.  It takes about 15 minutes to prepare, 30 minutes to bake, and about 3 minutes to devour! Smother with sauteed mushrooms or onions for a beautiful presentation, top with freshly chopped garden tomatoes, or eat by itself for a delicious, easy meal.


    Stuffed Zucchini by Erin Taylor

    1 box instant stuffing mix (I even used the generic brand and it was delicious!)
    1 medium zucchini (about  a foot long and about 3-4 inches across.)
    1/2 lb. breakfast sausage (I prefer the kind not in the casings, but you can use the link kind and remove the casings)
    Olive oil
    salt and pepper

    Turn oven on Broil setting.  Slice zucchini in half cross-wise, and then cut each half in half lengthwise.  Scoop out the seedy center with a spoon so you have a nice, smooth chanel running down the length of the zucchini.  Place a sheet of tin foil on bottom of baking sheet. Brush a little olive oil on pan where the zucchini will sit. Place zucchini halves onto foil lined sheet and brush tops with more olive oil. Sprinkle with a dash of salt and pepper and place in oven on middle rack and broil for 10-12 minutes or until tops are browned. (At this point you will begin making stuffing while zucchini is in oven.) Remove zucchini from oven and let cool a few minutes before stuffing. *Turn oven setting to Bake at 375 degrees.*

    Prepare stuffing mixture while zucchini is broiling.

    Make stuffing according to box directions, omitting butter or oil. (You won't need it with the sausage inside.) When stuffing is made, crumble (uncooked) breakfast sausage into the mixture and stir thoroughly with a wooden spoon (NOT your hands, it's too hot!) until mixed well. Scoop mixture into chanel in zucchini and spread across evenly. Use all the stuffing by heaping it across each zucchini evenly.

    Drizzle tops of zucchini with a little olive oil and place in oven set to 375 deg.  Bake for 30 minutes until stuffing is crispy and browned. Remove from oven and let sit a few minutes before serving.

    *Optional: You can make sauteed mushrooms or onions to place on top. Makes for a beautiful presentation and an extra pop of flavor, although it doesn't need it!

    Thursday, June 21, 2012

    Mint Chocolate Brownies


    Ok, folks. Mint + Chocolate + Brownies = a no-fail crowd pleaser!  These are from-scratch, so none of that out-of-the-box stuff here. (Although, I don't mind some out of the box brownies. Really.)

    Mint Chocolate Brownies  by Erin Taylor

    Brownies:
    1 1/4 C. Flour
    1 tsp baking powder
    1 tsp. salt
    2/3 C. unsweetened cocoa powder (not dutch-processed.)
    2 1/4 C. granulated Sugar
    1/2 C. chopped nuts* (pecans, almonds, walnuts... whatever. *Optional.)
    4 eggs
    3/4 C. butter, melted

    preheat oven to 350 deg.
    Throw everything in a big mixing bowl and stir until all ingredients are combined. Pour into greased 9 X 13 pan and bake for 25 to 30 minutes. Cool completely before frosting and serving.

    Mint Frosting:
    1/2 C. butter
    1/2 C. Shortening
    4 c. Powdered Sugar
    3 Tbsp milk
    1 egg
    1-2 tsp peppermint extract (depending on how minty you like it.)
    dash of salt
    green food coloring (about 4 drops, but you can make it as green as you like.)

    Whip all ingredients (but food coloring) in mixing bowl until light and fluffy.  Add food coloring and whip until mixture is all one uniform color. Spread over cooled brownies and drizzle with chocolate drizzle. (below)

    Chocolate drizzle:

    1 C. semi-sweet chocolate chips
    1 Tbsp. Shortening

    Melt chocolate chips and shortening in microwave safe bowl in 30 second increments, stirring after each, until chocolate is smooth and melted. Dip spoon into chocolate and drizzle in sweeping motions back and forth across the brownies. Repeat until all chocolate is used, or until brownies look to good to wait to eat any longer!


    Chicken Cordon Bleu Casserole


    Ha! I dreamed this recipe up in my sleep, but in the morning when I went to look for a recipe for regular Chicken Cordon Bleu, I found a gazillion recipes for the casserole! So much for an original idea. But, it's creamy and delicious, so I'm making it.  But mine has peas in it!

    Chicken Cordon Bleu Casserole  by Erin Taylor

    2 med. chicken breasts, cubed (uncooked)
    1 C. cubed ham (I used deli sliced ham and it worked really great.)
    1 box. Penne Pasta, prepared accoring to directions (Use whole wheat and get more fiber!)
    1  12 oz. package frozen peas
    2 C. Breadcrumbs mixed with 3 tbsp. melted butter (for topping)
    2 C. Swiss Cheese (one for the sauce)
    Swiss White Sauce recipe (below)

    Preheat oven to 375 deg.
    Spray bottom and sides of a 13 X 9 baking pan and pour in drained noodles. Add cubed chicken, ham, and frozen peas. Pour white sauce over the top and mix throughout. Spread 1 C. shredded swiss cheese over top. (*note: if you like a runnier sauce in your pasta, pour 1/2 C. milk over the mixture at this point and gently mix in. It will make your casserole a bit 'saucier'.) Sprinkle breadcrumb mixture over the top and bake, uncovered for 30 minutes.

    Swiss White Sauce

    1/2 cup butter
    1/4 cup all-purpose flour
    3 1/2 cups milk
    1C. shredded Swiss Cheese
    1 cup grated Parmesan cheese (green bottle from store is fine.)
    1/2 teaspoon salt
    1-2 tsp. dijon mustard (or yellow mustard for a lighter taste)

     Melt butter in a heavy saucepan over low heat; whisk in flour until smooth. Cook 1 minute, whisking constantly. Gradually stir in milk over medium heat, whisking constantly, until mixture is thickened and bubbly. Stir in Swiss and Parmesan cheeses, salt, and dijon mustard, stiring until cheese is melted and sauce is smooth. Salt to taste.  Pour over pasta and chicken mixture.

    Thursday, June 14, 2012

    Pecan Sandies


    Delicious buttery shortbread cookie loaded with chopped pecans and bits of chocolate. Melt in your mouth deliciousness!

    Pecan Sandies  by Erin Taylor

    2 sticks of butter, softened (or one stick and 1/2 C. shortening)
    1/3 C. sugar
    1/2 C. powdered sugar
    1/2 tsp. salt
    1 tsp. vanilla
    2 C. flour
    1 C. pecans, finely chopped
    1/2 C. chocolate, finely chopped (I used a Hershey bar, but choc. chips would work great, too.)

    Preheat oven to 350 deg.  In mixing bowl, combine butter sugars, salt, and vanilla. Mix until creamy. Add flour, nuts, and chocolate and mix until encorporated and no longer crumbly. It takes a minute or two so it isn't crumbly, but it will come together.

    Divide into two balls. Roll each ball into a long tube abou 2 inches in diameter. Wrap in plastic wrap and put in freezer for about an hour, or until firm.

    Slice in 1/4" slices and place on baking sheet. They will not spread much so they can be placed closer together. Bake for about 15 minutes or until barely golden on edges. Remove from oven and let cool before removing from baking sheet.  Serve with plenty of cold milk!

    Friday, June 1, 2012

    Rootbeer Float Cookies


    (picture taken from amybakeseverything.com where I got the original cookie recipe, and tweaked it a bit.)

    Rootbeer? In a cookie?  Don't knock-em til you try them, my friend. Also known as Whoopie Pies, these have a lovely rootbeer flavored soft cookie surrounding fluffy clouds of marshmallow creamy goodness.
    Go ahead and try to eat just one!

    Roobeer Float Cookies by Erin Taylor

    Preheat oven to 375

    In a bowl, blend  together:
    2 1/4 cups flour
    1/2 tsp baking soda
    1 tsp baking powder
    set aside.

    In a separate mixing bowl, cream:
    1 stick butter or margarine
    1 cup brown sugar, packed
    2 eggs
    1 tsp vanilla
    1/8 cup Root Beer Concentrate
    1 Tbsp Molasses

    Add dry ingredients and stir just until combined.

    Scoop out onto a baking sheet by teaspoonfulls, (NOT big blobs- you want to make little cookies and sandwich them together.) Bake for 8-10 minutes or until the cookies are firm and spring back when tapped. Allow to cool on wire racks. Fill with White Mountain Frosting filling below.

    White Mountain Frosting for Filling:

    In saucepan over medium heat, combine:
    3/4 cup sugar
    1/4 cup light corn syrup 
    2  tablespoons water
    cook until candy thermometer reads about 242 deg. Remove from heat.

    Beat 2 egg whites until stiff peaks form.

    While mixer is still running, slowly pour sugar syrup in. Mixture will become very glossy. Add:
    1 tsp. vanilla
    1/4 tsp. salt

    continue mixing for about 7 minutes or until cooled.

    Spoon filling into a plastic bag and squeeze out enough to fill each cookie. Place top on cookie, and enjoy! (Keep in a sealed container. Best if refrigerated.)

    Friday, February 10, 2012

    Creamy Italian Sausage Soup (or Zuppa Toscana)


    photo from kitchengirljo.blogspot.com

    It's winter. Soup is where it's at, people. Warm, creamy, heart-smiling soup.  Try this one for a bit of a zesty change. It's easy, it's delicious- what more could you want? (Oh, another bowl? Well, go right ahead!)

    Creamy Italian Sausage Soup (or Zuppa Toscana) by Erin Taylor

    (This is loosely based on Olive Garden's famous soup. I say "loosely" because I don't know their recipe, and have only tasted a few bites of this soup, but I got the idea from them.)

    2 Quarts water or chicken stock.
    *2 Tbsp. chicken bouillon paste (concentrated stock)* if NOT using chicken stock above.
    1 1/2 C. diced potatoes (peeled, or I used unpeeled red potatoes for a nice color contrast)
    1/2 lb. crumbled italian sausage. (If using large links in casing, use about 3, and remove outer casing.)
    1 C. powdered milk
    1/4 C. parmesan cheese ( fresh grated, or from the plastic shaker bottle)
    1-2 tsp. red pepper flakes (depending on how spicy hot you like it)
    1 tsp. minced garlic cloves
    1/2 C. chopped spinach or kale (optional)
    1/4 C. Corn starch mixed with 1/4 c. water (for thickening)
    salt and fresh ground pepper to taste

    In medium pot, brown crumbled sausage. Do not remove from pot when browned. Add water (or stock) and diced potatoes. Add about a tsp. salt and let simmer until potatoes are soft. (about 15 minutes.) Next, stir in the powdered milk and whisk until lumps are disolved. Then add parmesan cheese, red pepper flakes, garlic, spinach, and corn starch and water mix. Stir over med. heat until it becomes thicker. If too thick, add some water to thin. Add salt and pepper to desired taste. Let simmer for 10 - 15 minutes on LOW heat to let flavors develop.

    Enjoy with fresh sliced sour dough bread!

    Tuesday, January 24, 2012

    Creamy Chicken Gnocchi Soup

    Chicken and Gnocchi Soup
    Yes. Everybody loves Olive Garden's version of this fabulously creamy and delicious soup. I decided to try a version of it myself. I am not claiming to know their recipe, nor did I even attempt to dissect it. (In fact, I've never actually ordered it myself- I always just sneak some from my hubby's bowl.) But last weekend when it was cold and snowy, and our bodies yearned for warmth and comfort, this recipe was born in my kitchen, and will forever be a favorite.


    Creamy Chicken Gnocchi Soup   by Erin Taylor

    1 recipe homemade Gnocci (below, or 2 C. purchased gnocchi, prepared according to directions.)

    In large pot over medium heat, add:
    2 Quarts water
    2 Tbsp. concentrated chicken stock, bouillon, or other chicken stock substitute
    1/4 C. grated carrots
    2 C. chopped spinach
    1 C. powdered milk (important for an extra creamy flavor, but regular milk would do.)
    2 Tbsp. butter

    Let cook until warmed through. Then add:
    1 1/2 C. shredded chicken breast
    1/4 C. parmesan cheese (the finely grated kind in the plastic bottle works great for this recipe.)
    2 tsp. minced garlic cloves, or garlic powder
    salt and pepper to taste
    2 C. cooked Gnocci

    While soup is simmering, mix together:
    1 C. water
    1/4 C. flour or corn starch

    Add to soup and stir until soup begins to thicken. (It will not be the thickness of a chowder, but thicker than it was. )  Cook on med to low heat until spinach is wilted and a little darker in color.

    About 6 servings


    Homemade Gnocchi

    Combine in bowl:
    1 C. instant potato flakes
    1 C. boiling water

    mix until well combined. Add:
    2 tsp salt
    2 Tbsp parmesan cheese
    1 egg

    Potatoes will be runnier and gooey. Now, add:
    1 1/2 C. flour  (*add one cup, mix with spoon, add 1/4 C more, mix until too stiff to mix. Turn out on floured surface and knead with hands until you've incorporated the rest of the flour.)

    Break dough into 2 halves. Roll one half out into a long rope about 1" thick. Slice off 1/2" slices or "pillows". Poke each pillow with your knuckle to make an indentation in each to give it that authentic gnocchi look. Repeat with second half of dough.

    Heat large pot with water and let boil. Add the gnocchi in smaller batches (about 15 or so gnocchis at a time) and cook for about 2 minutes. Remove and place aside until ready to use in soup. Can be placed in plastic bag and refridgerated for use at a later time.

    Delicious with pasta sauce, or in soups.

    Makes about 3 1/2 C. cooked total.
    Friday, January 20, 2012

    French Silk Pie to DIE for!

    I absolutely adore chocolate cream pie. WITH A PASSION! But don't so much care for the chocolate puddding and whipped cream old standby. This, my friends, is divine! I found it on The Pioneer Woman's website HERE, along with about 50 million more reciped I want to try. And it is super easy, AND, it doesn't require whipped cream for the filling! Enjoy!

    choc pie creamed spinach pizza crust 058
    (picture taken from The Pioneer Woman website)

    French Silk Pie (from  The Pioneer Woman website, with a tiny bit of Erin added)

    Ingredients

    • 4 ounces, weight Unsweetened Baking Chocolate (I used about 1/2 C. plus 1 Tbsp regular semi-sweet chips because I like it sweeter.)
    • 1 cup Salted Butter, Softened
    • 1-1/2 cup Sugar
    • 1 teaspoon Vanilla Extract
    • 4 whole Eggs
    • 1 package Baked Pie Shell (homemade is fantastic, too.)

    Preparation Instructions

    In small microwave safe bowl melt 4 ounces of unsweetened baking chocolate until stirrable (about 45 seconds on high). Set aside to cool.
    In a large bowl with an electric mixer beat 1 cup (2 sticks) of regular (salted) butter and 1 ½ cups of white sugar until fluffy (about 1 to 2 minutes). When melted chocolate is cooled, drizzle it over the butter/sugar mixture. Add 1 teaspoon of vanilla extract. Beat the mixture thoroughly until combined (on a Kitchen Aid mixer, you will be using the whisk attachment).

    * (the following step is crucial you follow exactly):
    Turn your mixer to a medium speed and over a period of 15 to 20 minutes add in the four eggs, one at a time, leaving about 5 minutes between each egg addition. *Don't worry if the filling is gritty and sugary when you start adding the eggs. Once all the eggs are added, it is very smooth!

    Once the pie filling is well mixed, pour it into the baked and cooled pie shell, scraping every last speck of it out of the bowl. Smooth out the pie filling and place pie in the refrigerator to chill for at least two hours (preferably longer).

    *Erin's addition: I swirled in some softened marshmallow cream after the filling was finished mixing to make a chocolate marshmallow pie. It was VERY sweet. I would use unsweetened chocolate in place of the semi-sweet chips I used if I were to add marshmallow cream again.

    THE Quiche

    This recipe really should be called "Pepper Cheese Quiche" because it has delicious roasted red bell peppers and tons and tons of...